There are dozens of activities that use your computer’s internet data at any given moment. Apps stay up to date to send you the latest notifications, the operating system checks for updates and backs up your files, and your browser’s add-ons have their dedicated connections — the list is endless. This is a headache, especially if you’ve got limited bandwidth. If you’re facing this, consider limiting your MacBook or PC’s Wi-Fi data.
Whether you’re on macOS or Windows, you can restrict how much of your network’s bandwidth your computer can consume. In addition, third-party software lets you set a limit on individual apps’ data access or block them off entirely from the internet. Here’s how to set data limits on your Mac or PC.
Set a data limit on Windows PC’s Wi-Fi
On Windows 10 and Windows 11, you can set up a usage limit for the connected Wi-Fi or Ethernet network right from the Settings. When you activate it, Windows will also recognize the network as a metered connection and pause a range of data-hungry background activities to save bandwidth, such as automatic updates and OneDrive backups. When you’re close to hitting the limit, your PC will warn you, and once you cross it, it will suggest disconnecting or switching to a different network. It won’t, unfortunately, automatically cut off apps’ internet access when you are over the limit.
Go to Settings > Network & Internet > Status, click “Data usage,” and then select “Enter limit.” Under “Limit Type,” you can choose whether you’d set the data limit to reset monthly with the “Monthly option” or after a certain number of days with “One Time.” Enter how much data you can afford in either MB or GB in the “Data limit” text box, and hit “Save.”
If you’re on Windows 11, the data usage options are located under Settings > Network & internet > Data usage.
Although Windows houses a functional tool for restricting data access, it lacks several features that can prove helpful, such as app-based limits. For that, you will need the NetBalancer program.
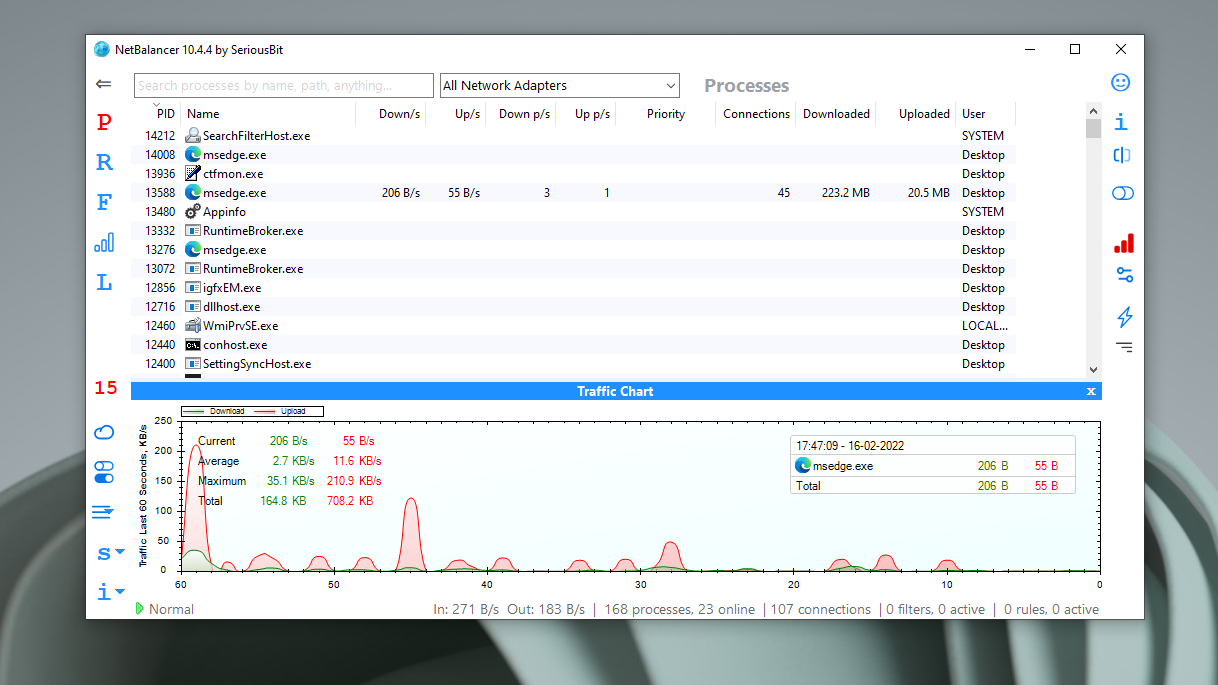
With NetBalancer, you can easily cap any particular app’s data usage and freeze its connection when it reaches the set limit. Instead of entirely blocking off access, you can also throttle an app’s download and upload speeds so that you don’t quickly run out of your plan’s allowance.
Launch NetBalancer, right-click the app or process you want to restrict and select “Create Rule.” Enable “Select the traffic amount condition when this rule becomes active,” switch “Less Than” to “More Than,” and enter the amount of data you want to allocate to this app.
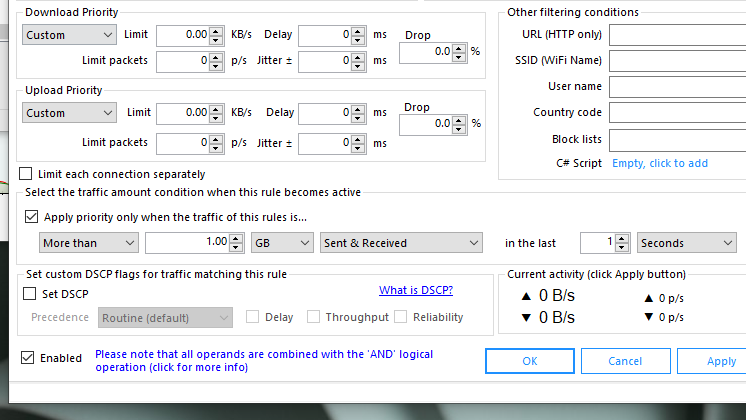
In the “Download Priority” and “Upload Priority” fields, pick “Custom” in the “Normal” dropdown. Next, set the values to zero if you want to cut off its access to the internet altogether or punch in a throttled set of bandwidths. Do note that this is locked behind a paywall.
NetBalancer has a 15-day trial where you can try out a couple of essential features. After that, it costs $50.
Set a data limit on Mac’s Wi-Fi
Unlike Windows, macOS doesn’t offer a built-in tool to control your network’s bandwidth. You will have to turn to a third-party app called Tripmode.
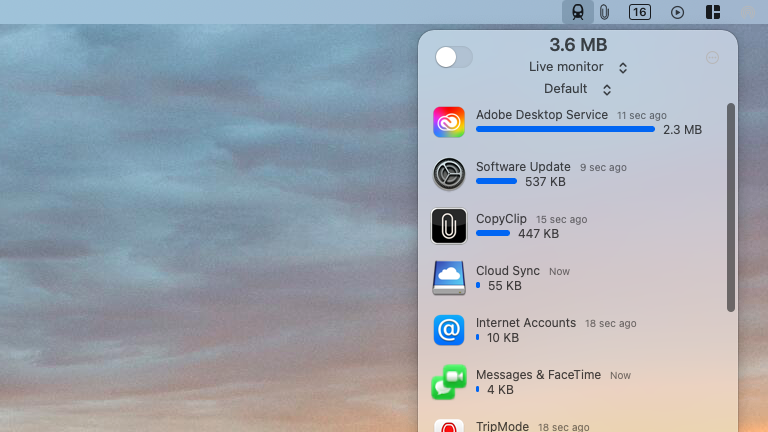
Tripmode allows you to manage the available data bandwidth precisely how you wish to. You can not only block off apps from spending too much of your internet plan but also gain insights into your total usage and figure out where you need to cut corners.
Once you download and configure Tripmode, it’s available on the menu bar, where you’ll find a list of apps that are currently online and how much data they are consuming. You can click the “live monitor” dropdown to view your data stats from the last week and month. The toggle next to that lets you instantly shut off internet access for all apps.
For setting data limits, you need to click the three-dot button and head into the “Settings.” Visit the “Profiles” tab, and select the little plus button at the bottom left corner to create a new metered profile. Check the “Monitor data usage” box and in the “Block all after” field, enter the amount of data after which you’d like Tripmode to automatically pause internet access for all apps. Tripmode will send you a warning when you’re close to exhausting your limit.
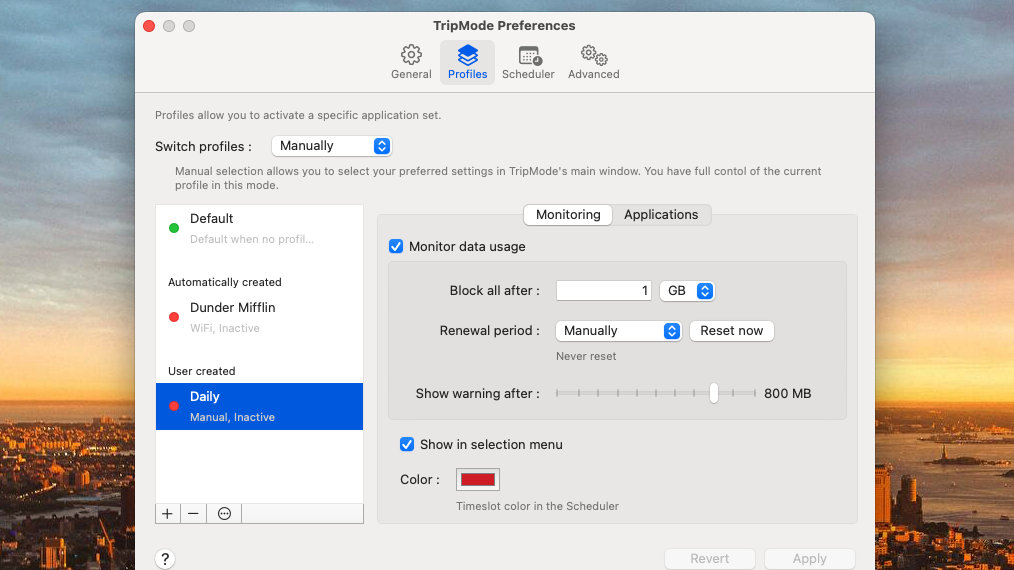
With the “Renewal period” dropdown, you can either enable Tripmode to reset this limit or keep it at “Manually” to do it yourself once the allowance expires. By default, this profile will apply to all your Mac’s activities. If you want to execute this for just a group of apps, you can add those in the “Applications” section. Hit “Apply” to save your profile.
To activate your new profile, first set the “Switch profiles” dropdown in that same “Profiles” tab to “Manually” and then choose your profile’s name in the Tripmode menu bar utility’s “Default” dropdown.
Alternatively, in case you want Tripmode to switch profiles itself based on the connected network, change the “Switch profiles” dropdown to “Automatically,” and when you do that, it will create a new profile for every Wi-Fi network you can log into. You can then customize the limits for each Wi-Fi entry in the “Profiles” tab.
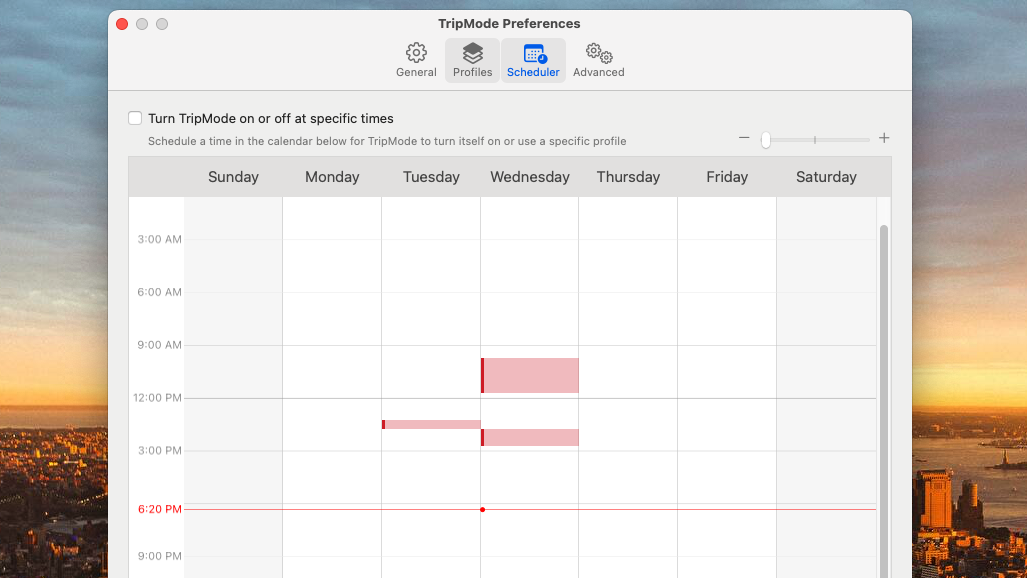
Tripmode has a couple more handy features. From Settings > Scheduler, you can automate Tripmode to activate at a specific time. It can also block any new app from connecting to the internet until you approve it in your configured profile, and alert you whenever a disabled app tries to get online.
Tripmode has a week-long trial, after which it will cost you a one-time $15 fee.


![W88 [Rủi Ro Khi Chơi Nổ Hũ: Lưu Ý Quan Trọng Nhất Cho Người Chơi]](https://theskil.com/wp-content/themes/rehub-theme/images/default/noimage_336_220.png)

